Ideas from Ed: A Sash in a Flash (Vol. 9, Issue 4)
- edwardpetrus

- Apr 1
- 5 min read
If you follow my articles, you know that I’m a decent woodworker. Not a great one, but a decent one. I do like a challenge, and it’s certainly rewarding when I build something that someone needed and had no idea where to get help. The Lawrence County Historical Society here in my town is in the process of replacing several window air conditioners with some type of whole-house system. While removing one of the units, it was discovered that the lower sash for a window had disappeared. Apparently it was removed to fit the window AC into place and then lost somewhere, and despite a thorough search could not be found. The building is a historic mansion, and just putting up some plywood would not do. I offered to build a sash from scratch, matching it to the others as best as I could. I don’t go into detail in this month’s article, as there are many nuances in the design that needed to be addressed to assure the sash would fit. However, I will feature the basics of the build as well as share a tip or two along the way.
Here is a sash from a different window. Unfortunately, it’s not the same size as the one that’s needed, so I couldn’t make an exact copy. I had to rely on taking good measurements of the window opening. Nonetheless, this “other” sash was my model for the general build.


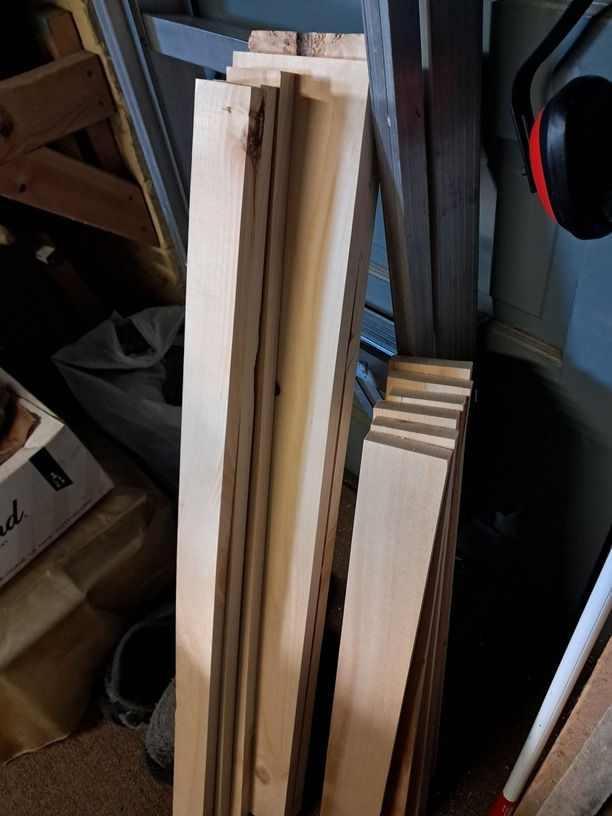
The overall thickness of the lower three sections of the sash needed to be 1 ¾”. That meant that I could not use “2x” material, but would have to build the thickness up from laminating pieces together. (A 2x4 is really only 1 ½” thick.) I purchased three 6-foot-long 1x10 pine boards, trying to find those with few knots and no warp or bow. The outside will be painted and the inside stained, and having wide boards to start let me cut around some of the serious defects. (Note that clear lumber in pine or poplar could have been used but is much more expensive.)

I rough cut pieces a bit wider and a bit longer than needed. Final sizing would be done later.
I reasoned that a mortise-and-tenon connection between the pieces would be the best way to build this. Since the thickness would be built up through lamination, I “cheated” and let the lamination form the mortises and tenons. After calculating the lengths needed, I sandwiched the pieces together leaving tenons protruding from the top and bottom, and mortises on the ends of the sides. At this point, I had three pieces together making a total thickness of 2 ¼” (three times the thickness of a single ¾” board).

Here’s a tip when sandwiching pieces together. Once glue is applied to the face of a board, it’s very difficult to align with another board when clamping because the glue acts like grease. The slipping can be eliminated by driving a couple of small brads into the face of a board, then nipping off the head so that it just protrudes above the surface. When the second board is placed against it, the nailheads will keep things from sliding around. Here’s a picture of the protruding head of a brad. They don’t need to be long or heavy-duty, but be sure to place them where you won’t later be cutting or using another tool.

Since the built-up pieces were now thicker than needed, I ran them through my planer, alternating the faces with each pass. That meant that the outer layers would be the same thickness but thinner than the untouched center layer. I also ran one bundled edge over my jointer to assure the edges of each layer aligned. I then ripped them to near-exact width and cleaned up to final width on the jointer.
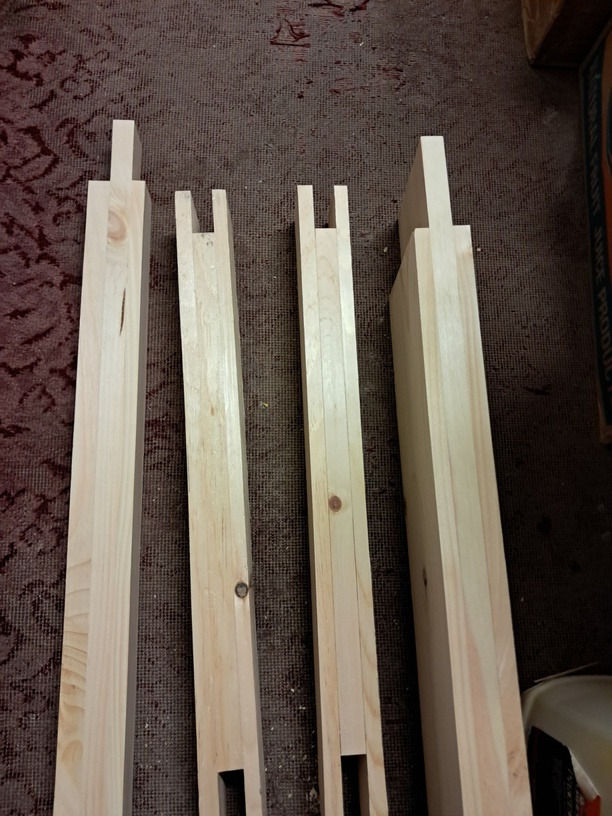
This test-fitting shows the general plan.

I used my router and put a decent decorative shape on the inside edges. I didn’t get hung up that the “corners” were rounded rather than squared off.

The mortise-and-tenon joints were thoroughly glued and I pinned them with wood dowels to assure they would not come apart. Things got a little bit “wonky” on the outside when I wanted to make the recess for glass. It seems the glass slips into a channel on the underside of the top piece, but sits in a rabbet on the other three sides. I routed a rabbet on those three sides, stopping shy of the top. (Routing the pieces before assembly could not be done since the side rabbet would show when that piece is mated to the top.) To fit the planned glass in place, the corners had to be chiseled square.


The top section was wider than the rest of the frame, so I laminated additional wood onto it, mimicking the original. However, the original also had a “flap” of metal presumably to offer additional weatherproofing. I also cut a groove into the lower three sides like the original so it could fit onto the metal inserts in the window frame, again for sealing out the weather. I cut the bottom of the sash at a 15 degree angle to match the model sash.


Here is the sash with the woodworking part completed.


I ordered double-strength glass to fit the sash. I’ll let the LCHS people finish the inside with the appropriate stain and varnish to match the other woodwork in the room. I did paint the outside with primer while waiting for the glass to be cut.

Our local supplier cut the glass to the exact dimensions I requested for around $17. I used several glazier’s points to hold the glass in the sash, and used glazing compound to complete the work. (If you need to know how to glaze, check out one of my previous columns, “Glazing in the glass”.) I also added some hardware (two lift fixtures) from my box of spare window parts. I will add a lock to the top once everything is installed and in place. Here is the final product ready for delivery to the Historical Society.


I hope all your projects go well. Thanks for reading, and happy restoring!
Ed
Post-article note: I installed this sash at the Historical Society and it only needed a single pass of a plane along one edge to fit well. It will be stained in place. With the installation of air conditioning at the LCHS mansion, this window will most likely never be opened, so any edges not getting stain won’t be an issue.

If you’d like to download a PDF of this “Ideas” column, click here:


Great insights shared in Ideas from Ed: A Sash in a Flash (Vol. 9, Issue 4). The creativity and practical thinking behind the article make it very engaging for readers who enjoy learning new perspectives. I especially appreciate how the ideas are presented in a simple yet powerful way. Platforms like yaar win also show how innovation and user engagement can go hand in hand in today’s digital world. Content like this inspires more discussion and knowledge sharing. Looking forward to more updates and creative volumes in the future from this series and similar educational publications online thank you sharing
Really enjoyed reading this update there’s something satisfying about seeing careful restoration work done right. Choosing double-strength glass for durability sounds like a smart move, especially for preserving the structure long-term. It’s also great that you coordinated with LCHS to ensure the interior finish matches the existing woodwork; those details make a big difference in maintaining authenticity. Even the step of priming the exterior while waiting shows solid planning and attention. Projects like this take patience, but the results are always worth it. Looking forward to seeing the final outcome See more of your progress and insights as the work continues!