Ideas from Ed: KDAT that! (Volume 9, Issue 2)
- edwardpetrus

- Feb 1
- 6 min read
Fun times again! This month I’m showcasing the “rebuilding” of an old porch floor. It was a bit of a challenge because it was two hours away from my home. That meant carrying a lot of tools to the site and getting things done as quickly as possible to avoid leaving things in a condition where problems would occur if it rained! (There is a roof over this porch, but there is also a cellar beneath it.) I pulled up the glued-down indoor/outdoor carpeting and saw that the ends of the boards suffered from the dripping rain gutter above it. There was even some rot and termite damage.

Surprisingly, and I guess because the majority of the porch was under roof, the main section was ugly but in good structural condition.

The homeowner decided that a second floor over this existing one would be the best way to get this job done quickly and yet present a nice end result.
If you ask for KDAT at most any big-box store that sells lumber, you will be greeted by a puzzled look from the employees. KDAT means kiln dried after treatment. If you’ve read any of my previous “Ideas” columns where pressure-treated wood was involved, you’ll recall me noting that it is usually very wet from the chemical treatment and that it shrinks dramatically as it dries. That makes precision construction impossible. KDAT lumber, as the name suggests, has been artificially and intentionally dried after the chemical treatment is applied. That minimizes shrinkage. I had to special-order KDAT tongue-and-groove flooring from a real lumberyard. I figured that I’d need about 85 boards roughly 6’ long, so I ordered 45 boards of 12’ length.
As always, I show you what I use without specifically endorsing any particular brand or product. I have always had good luck with the Yella brand of treated wood, and what showed up in the delivery had these stickers on them:


Of note is that the manufacturer recommends painting ALL FOUR SIDES of the boards before installation, even though that would be a very difficult and cumbersome job. I reasoned that since it would be under roof, it should last longer than the existing flooring, which wasn’t even pressure-treated. I did, however, set a goal of getting at least a good coat of stain or paint on it as soon as possible (and before any rain!).
At one point, the house had a façade of fake stone installed. That façade was placed over the existing flooring, making the boards appear to be nicely tucked under the stonework. Since I’d be adding a new layer of flooring over the old, I didn’t want the ends of the boards to simply butt against the irregular face of the stone. I measured the thickness of the KDAT flooring. I rigged up a support for my angle grinder with a cutoff wheel installed and sliced the faux stone siding just enough that a new board would tuck neatly under it.


I had to trim some of the boards around several obstacles, including the small step at the door itself and the banister post. I knocked out the short supports under the banister lower rails to make the flooring installation easier, but will need to reinstall them to keep the rails from drooping over time under their own weight.


The porch has aluminum pillars covering the posts that support the roof. I slipped their bases up the pillars enough to allow me to trim the appropriate boards to surround them but be hidden when the bases were pushed back down.


I don’t own a flooring nailer, but used my regular nailer by holding it at a 45-degree angle to each board tongue while driving in the nails. Here is my nailer and a box of the 2 ½” 16-gauge galvanized finishing nails that I used. With 2500 nails in the box, I could use 29 nails per board and still have enough, so I used them generously.

This is a porch, not a deck, and with tongue-and-groove boards, it’s important to get them pressed tightly together. The porch has “pitch” for water to run off, and again, is mostly under roof. Having a cellar below makes keeping water off even more important. I fabricated these two wood wedges:

By screwing one to the old floor and driving the second one between it and a board, the flooring was pushed tightly together. I drove several nails near the wedges, and then repeated the operation three times on each board, moving the wedges along as needed. Even so, there were a few small joints that were less than perfect because of imperfections (curves/bows) in the boards that could not be fully overcome.


I trimmed the groove from the first flooring board and the tongue from the last one for appearance sake. I left the ends of the boards away from the house “long” so that a chalkline could be snapped and everything cut at once.

It may be a bit of overkill, but since the very ends would be the most exposed, I also ran a bead of good exterior adhesive into the grooves for about the last 10”. I reasoned that it may help keep the boards together a bit better despite the adverse weather they face.

The only real problem I had is that I needed to return home without finishing things as much as I had hoped, leaving the completion for another time. What is still needed is a façade board running completely around the porch under the flooring, screwed to the existing rim joists. I also wanted to make some thin slats of treated wood and nail them around the porch to cover the board ends. (Remember, the old flooring ends are also visible in an end view, under the new flooring.) Since rain was predicted for the next day, I applied a coat of good exterior solid stain to help protect it all. I caulked the edges against the house and used a bit of latex caulk here and there to fill imperfections. The solid stain offers cover akin to that of paint.

It looks weird being stained before cutting the ends straight! I’ll complete that task and the rest of this project when I get a chance to make another trip to this house.
UPDATE! Before publishing this article, I returned to the house to finish the porch. Here’s (as Paul Harvey used to say) “the rest of the story”.
My next step was to bolster the porch with screwed-on pressure-treated 2x8 rim joists. These might add a bit of structural strength, but really function most as a quick cover-up for any rot beneath them. Note that I had to cut-to-fit around the gas pipe entrance behind the meter.

Once that was done, I measured back from several of the uncut flooring ends to the 2x8, marked that on the porch, and snapped a chalkline from end to end. I used a circular saw to cut along the line, through the new and the old flooring, essentially keeping the ends flush with the 2x8 below as much as was possible. I cut slowly to keep the edge nice and straight.

I was then able to put the banister supports back under their bottoms. Screwing them in place was a bit of a challenge because the drill/driver could not be aligned properly to drive the screws at the needed angle to securely anchor to the floor. I used a right-angle adapter in my drill which made things possible.

I cut thin (3/8”) strips from treated wood, about two inches wide, to cover the raw edges, and began attaching them. I used a bead of construction adhesive on all the raw ends, and then shot 2” 16-gauge galvanized finishing nails through them. I used plenty of nails, with at least one in every porch board end.


After some miscellaneous monkeying-around, like cutting a block to support the downspout, I gave the new wood a light sanding and then stained it all. I gave this newest work two coats over several hours, and gave a second coat to the work done last time.

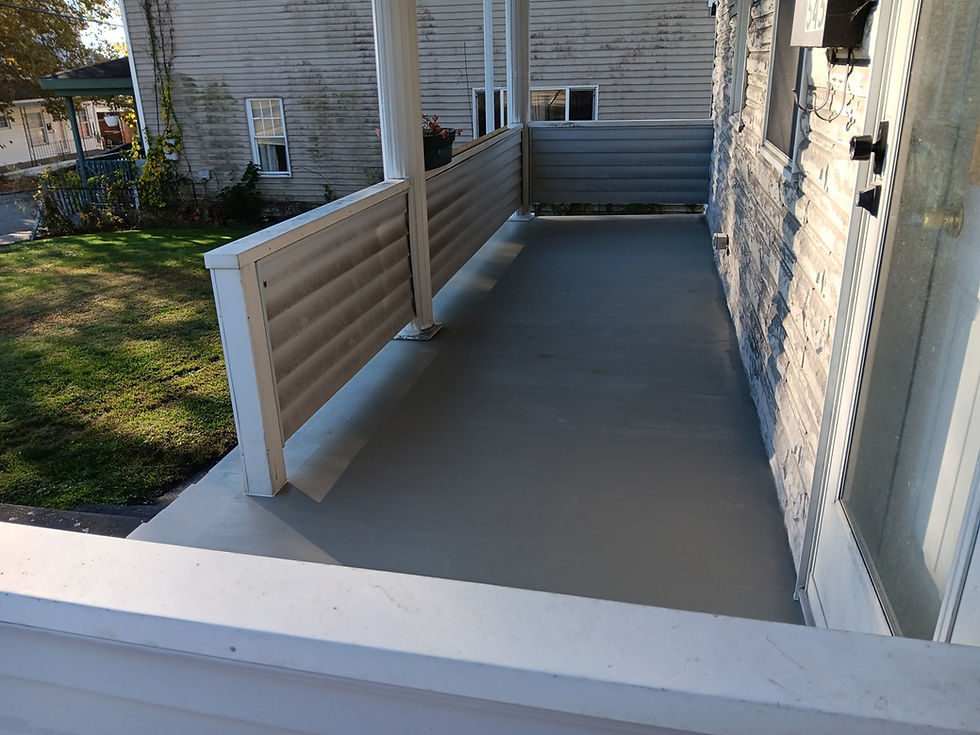
I saved the 90-degree aluminum carpet hold-down strip that was there when I first started this project, and used stainless steel screws to fasten it at the edge where traffic would enter and leave the porch. The homeowner also had an old unopened can of gray porch paint – the good kind that is full of all sorts of nasty chemicals which made those old paints superior to today’s – and I scraped and painted the brick work under the porch. This is how things looked when I left to come home. A brushful of white paint to touch up the column bases is still needed (they are simply ugly, but NOT from gray paint or stain inadvertently slopped onto them!).

I hope all your projects go well. Thanks for reading, and happy restoring!
Ed
If you’d like to download a PDF of this “Ideas” column, click here:


Comments