
Ideas from Ed: No Tears Shed (Vol. 9, Issue 10)

This will be a rather unusual one, even for me. It’s not really showing you HOW I did something (or how YOU should do something) but simply showing something that I did. My point is to demonstrate that with some creative thinking and a lot of effort even larger projects are doable.
Both my house and my detached garage have 100-year-old green tile roofs. I live in a historic district and love the look of the roof, but not everyone with a tile roof has been fortunate enough to be able to maintain it. For example, I’ve had to replace tiles here and there when tree branches fell and broke them. I have a small stockpile of extra tiles I’ve gathered over the years and a few that “came with the house”. One of my neighbors has a roof nearly identical to mine but it’s more of a terra cotta color and not green. That neighbor has been fighting the roof for years (mostly due to ice sliding from upper sections and smashing lower tiles). I was not happy to hear that the neighbor was going to replace the whole roof with a shingled one because I believe the tile adds character to the house, but it’s not my house and I respect the decision to do something to keep the house watertight. I hoped that I could save a few of the tiles (especially the rarer ones like the ridges and eave tiles) and could always paint them if I had to use them on my house.
I do some of my best thinking while in bed trying to fall asleep. I thought about one of my other goals for this summer – rebuilding the old and rotting shed next to my garage. I wondered if I could save enough of the neighbor’s roof tiles to completely tile my shed. If so, then my house, my garage, and the shed would all have tile roofs! The neighbor and the roofer she hired were agreeable to my plan, and I gave them a donation to help offset the hassle. (The roofer’s plan would normally be to just rip the tiles off and toss them to the ground, breaking most in the process.) I stayed on the opposite side of the house from where the roofers were working and removed a lot of tiles myself. They graciously saved the ridge tiles which I couldn’t access from a short ladder.
Here are some of the tiles I saved:


Over the course of several days, I wire brushed and painted them with custom-colored paint to match my roof as closely as possible.
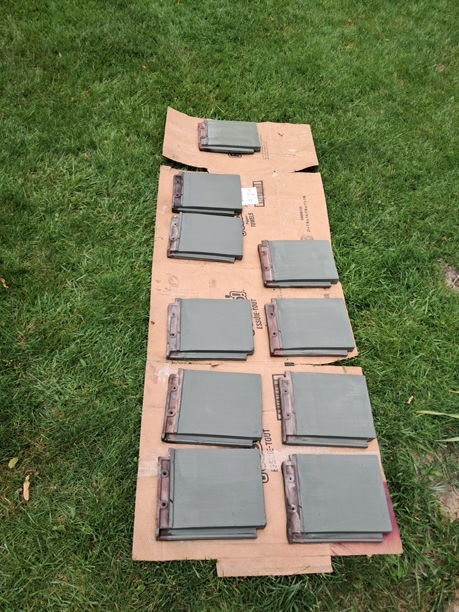


Thinking things through, it occurred to me that I should build the new shed using 2x6 construction rather than 2x4, and use ¾” plywood for the roof instead of ½” plywood or OSB (oriented strand board). These tiles are HEAVY and the support for them needs to be substantial! I also tried to “lay out the roof” on my driveway. The roof would need to be sized to fit the tiles, since they can’t simply be cut to fit like a shingle can.
Here’s the old shed, already partially disassembled then entirely removed:


The new shed would be roughly the same dimensions as the old, but taller. Technically, the interior space would be less because of the 2x6 walls. Here’s the floor taking shape:
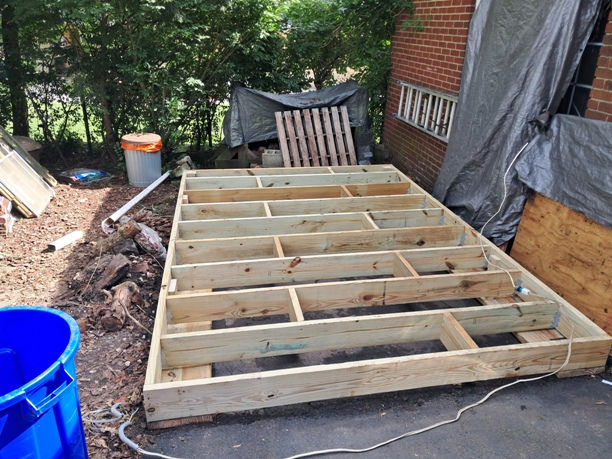

I used 2x8s for the floor structure and, of course, all wood was pressure treated and rated for ground contact. All fasteners were either hot-dipped galvanized or ceramic coated.
Walls went up in the usual manner. The wall structure was planned to a height where (including a double top plate) they were 2” shorter than the 8’ Smartside panels I used for siding. That allowed the bottom of the siding to extend 1 ½” below the joint between the 2x8 lumber and the ½” flooring.


I installed the siding onto the front wall after the wall was up, and after figuring out just how to achieve the 4’ double-door opening I wanted. I rough cut the door openings.

My plan was to have the tiles overhang the roof edge by 1”, and have six rows of tiles to the peak on each side. I used my “driveway layout” to calculate the lengths of the needed rafters and began cutting and installing the roof structure. I nailed hurricane ties to each rafter:


Some days I had to wrap things up due to stormy weather!

My son helped me lift the heavy ¾” plywood onto the roof and I nailed it all down with more galvanized nails.

I nailed down drip edges, covered the entire roof with snow and ice shield, and began nailing down the tiles. Each tile needed two copper nails. The nails were salvaged from the neighbor’s roof and were in as good a condition as they were 100 years ago when her house was originally roofed. Note how the painted tiles closely match the roof of my adjacent garage.


I installed the two leaded-glass windows from the old shed. They were originally in a wall in my house when it was constructed 100 years ago. Then I finished the door opening and the doors.


I wired several outlets in the shed, plus switches for overhead lights and a control for a nearby water fountain. I installed the rest of the trim using overlaps at corners to shed water better than miters. I caulked the top side of any trim that might be hit with rain.

I installed lattice along the foundation where critters might seek lodging and carefully applied a solid stain/sealer to all the trim. The main sections of the siding come pre-primered and will be left as is. I’m very proud of how it all turned out:

I hope all your projects go well. Thanks for reading, and happy restoring!
Ed
If you’d like to download a PDF of this “Ideas” column, click here:

Comments