Ideas from Ed: Backsplash backlash (Volume 9, Issue 6)
- edwardpetrus
- Jun 1
- 4 min read
Some projects go smoothly, and when completed, give the DIYer a lot to be proud of. Other ones tend to be a bit of a challenge, may not turn out as well as hoped, but nonetheless serve as a learning tool for future projects. In this case, my learning might help save you some aggravation if you’re tackling a similar project.
A woman asked me to install a group of stick-on tiles to cover the backsplash/wall behind her kitchen sink, oven, and even on the bulkhead over everything. Here’s a picture showing what was there prior to any work by me:
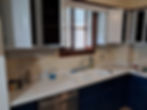
That may not be my favorite design or pattern, but it was presentable, well-adhered, and functional. To select a replacement covering, there are a lot of things which should be taken into consideration. Obviously the new pattern should be one that is pleasing to the homeowner. The “plumbness” and “squareness” of the existing walls must be considered. In other words, if the area which will be covered isn’t perfectly “right” then the pattern should be one that helps to hide the imperfections rather than accent them. “Solids” work better than linear patterns in that situation. The dimensions and composition should be such that placement can be made in a workmanlike manner without specialized equipment that most DIYers don’t have. In this situation, the replacement tiles could not have been a worse choice! I’m not fond of the pattern, but again, it must be pleasing to the owner and not to me. However, these tiles have very dramatic patterning, so alignment is critical. In addition, the linear patterning would emphasize wall imperfections rather than hide them. Worse yet, they are not “solid” but are made up of an assembly of smaller pieces with a sort of “webbing” between them. That means they have “give” in each direction and can easily be placed a bit askew of the desired location. They are skinned with very thin aluminum, but have small square glass adornments throughout. Not only would they be difficult to cut but if a glass section happened to be where a cut needed to be, the glass would be dislodged (leaving a squarish “hole” in its place).


There may be a place where these tiles would be appropriate, but I envisioned all of the problems I’d have installing them, and I was right!
The plot thickens. The homeowner had someone else “cover over” the old backsplash with this:


I will likely spend an eternity in he!! for the thoughts I had while trying to do this install! Note that I am not saying that both products are necessarily bad – just that they were awful in this situation. The adhesive mat does smooth the surface over, but both it and the self-adhesive tiles want to stay in the position where they first make contact with each other. There was ZERO movement. If they touched, they stuck together and only a hammer and chisel would pull them apart. (Ask me how I know…) I avoided a little of the headache by placing each tile with its peel-off backing still in place against the wall while the wall also had its protective peel-off cover in place. Then I trimmed the tile as needed to fit, cut away the wall peel-off only immediately around that single tile, then peeled each cover off. That way, the tile would not stick to anything other than the general area where it belonged. (In the photo at the beginning of this article you can see the peel-off layer trimmed and removed from the wall only where the pictured tile will go.)
Remember the zero movement adhesion. I tried my best to make the vertical lines plumb and the horizontal lines level and aligned, but every once in a while I had to trim a tile slightly to make a “correction”. Since I couldn’t cut through the glass pieces, I couldn’t “center” some things, but instead had to calculate the layout position so there were the fewest spots where the glass lined up and needed cut. I deemed it was critical that full tile sub-sections met on an outside corner, but that meant allowing the adjacent corner to be one where tiles met out of alignment.


In summary, should you be considering something like this:
1) choose a pleasing pattern
2) choose a pattern that disguises wall imperfections rather than emphasizes them
3) select tiles that are “solid” and have no inherent “flexibility” in all directions
4) use tiles that can be easily cut, and cut at any location (not aluminum-clad with glass ornaments)
5) use EITHER a wall adhesive or adhesive tiles, but not both
I’ll add one more thought, too. While planning the layout and installation, be sure the “best” part is where eyes tend to be first drawn. Being a bit “off” in an inconspicuous area is much less noticeable.
I hope all your projects go well. Thanks for reading, and happy restoring!
Ed
If you’d like to download a PDF of this “Ideas” column, click here: