
Ideas from Ed: Do tread on me (Vol. 9, Issue 7)

There aren’t a lot of photos in this month’s article, because the work is very straightforward. I’m simply showing you an easy way to deal with an issue, or at least how I dealt with it.
This particular location is a house with laminate flooring throughout. I’m not a fan of laminate, and I know that under some of the laminate is an oak floor that could have been refinished, but it’s not my house! At least the laminate used was a high quality one, with a 12mm wear layer. The long and short of it is that the homeowner had several boxes of leftover flooring and wanted the “side steps” from the outside door toward the kitchen to be covered. I will admit that they were pretty ugly in the condition in this “before” photo, sporting several layers of glued-down linoleum:
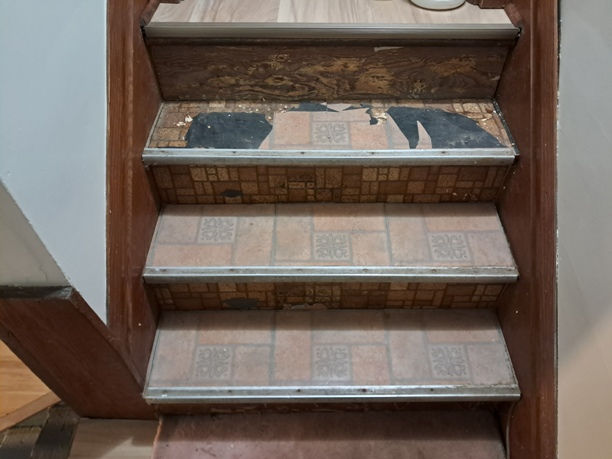
As is often the case, this project started with the undoing of the work done by others before me, meaning stripping off the old to make way for the new. The hardest part was actually getting the screws out of the edge protectors. After many shoes have rubbed over them for years, there weren’t many screws with enough of the heads to allow a screwdriver to get a good grip on them. I didn’t have my impact driver with me, but hammered the screwdriver that was handy into the screw heads enough to get things started. Then I was able to grasp the heads with pliers to twist them out.
Here is the stairway with treads cleaned up a bit:

I removed the old linoleum from the treads but not the risers, where it was well-adhered (and I’d be covering them). The biggest decision I had to make was whether to install the treads and put the risers over them, or install the riser coverings and put the treads against them. Usually the latter looks better, since the line of eyesight isn’t so much “into the joint” as in the first scenario. In this case, I deemed that the stairway was “straighter” in the vertical direction than the horizontal one, so I cut and installed the treads first. I used a full-width (8 ½”) piece of laminate at the front of each step where the greatest impact from traffic would be, and spliced in a narrow piece at the back edge of each tread to match the width of the wood below.


I cut risers from a single board since the necessary width was less than the width of the laminate. They are just press-fitted in place in the photo below, but will be tacked in place with a few small brads. I re-installed the original silver edging so the steps can be safely used until the homeowner purchases new ones (in bronze color) to match the one at the very top.

I do need to say a few things to clarify the work. First of all, this laminate is intended to be installed as a floating floor, and not held down with edging, nails, or anything else. In this case, since each piece is so small, the risk of problems from expansion and contraction are minimal. Further, the instructions on the laminate package specifically state that the material is not recommended for steps. I don’t know whether that’s because they can be slippery, because they would wear quickly, or what. Again, though, this is a low-use stairway, a minimal number of steps, and these pieces are easily replaceable should wear be an issue.
I hope all your projects go well. Thanks for reading, and happy restoring!
Ed
If you’d like to download a PDF of this “Ideas” column, click here:


Bitcoin explainers tend to swing between oversimplified and impenetrable. Join The BTC aims for the middle ground, offering insights that respect the reader's intelligence while staying accessible.